
Orienteering EventsWhat to Expect
- Home >
- Information >
- Go Orienteering >
- Orienteering Events
Local events are usually low key and in the 'localised' area, ideal for newcomers to try the sport and Training events are non competitive and used for training and coaching, aimed at members of the club, but they can attract people from neighbouring clubs, and are often ideal for newcomers to try the sport. Regional events attract participants from around the local Region, National events are high quality competitions that will attract people from far away, Major events are Major Events such as a British Championships.
Types of event
A "Normal" event is where you visit a fixed number of controls in order and the fastest time wins.
At score events, you have to visit as many controls as possible, in any order, in the time allowed.
Relay events are held for teams of three or four, often with a mass start.
Night events are held at night ...
City races are held town and city centres...
Sprint-O courses are short, sometimes with a prologue to decide starting times in the head-to-head final.
String courses are short (about 500-1000m), and you can follow the string between controls. Ideal for very young competitors. Sometimes there are also a few controls off the string (an Off-String course).
Trail-O is precision orienteering and can be enjoyed by those with impaired mobility. The course is not timed. Instead, at each control point there are a number of control marker flags. Competitors have to decide which one is in the correct place according to the map and control description.
What to expect at an event
Arriving
The website will usually state when event registration will be open (usually for an hour or two) and the range of start times. As a newcomer it’s a good idea to arrive fairly early. Ideally, travel with someone from your local club, or arrange to meet them there. When you arrive, head towards “Registration”.
Registration
Registration is the ideal place to ask any questions – such as if there’s someone available who can talk you through the basics. Provided you’ve arrived in plenty of time, someone will be happy to help!
You can orienteer on your own or as a family group – just ask at registration and they’ll guide you through the process.
You will normally fill in a short form giving your name and contact details (if you’re not already a member), Courses will usually be as shown as in the colour-coded table below, so you just choose which you want to enter. For beginner adults we usually recommend an Orange course, while a White course is an ideal starting point for children.
Urban events usually have a different measurement of difficulty, more based on the length, but can also be the distance between controls.
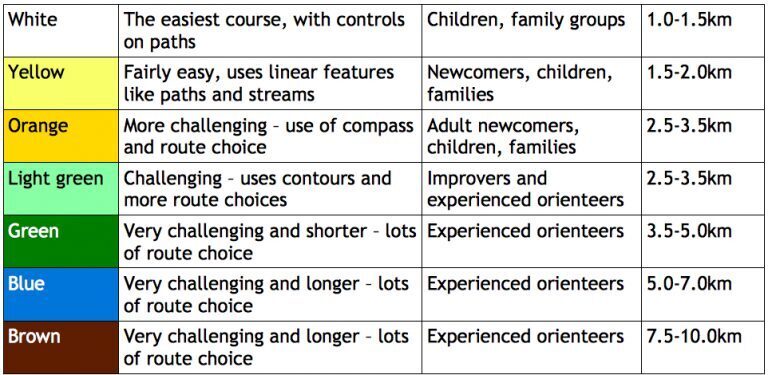
Course colours explanation
Experienced orienteers are given their maps at the start but beginners – especially children – usually collect their map at registration to give extra time to understand it before they set off.
You may be given an electronic ‘chip’ which manages the timing for you and stores details of the control points as you visit them. Remember to ‘punch’ your chip at the start, at each control and at the finish, to show you’ve been there.
Start-times and route to the start
The setup at the start will depend on the size of the event, and often involves sending people off at intervals of a minute or two. You can find out the starting point, starting process and your starting time from registration.
Download and results
When you’ve finished, go to the table or tent marked ‘Download’ – here you will receive your printout confirming which controls you visited and how long you took for each one. Download will probably be where registration was before your run.
At some events the results will be on display almost as soon as you have finished. For others you might have to wait until the results appear on the club’s website (usually later that day). Don’t worry about your time though – your main aim should be to find the controls and enjoy yourself!
Top tips for starting out
Orienteering takes a bit of practice, and these basic techniques should help you:
- Look at the map legend and see what the different colours refer to.
- Fold the map so you can easily focus on the bit that matters at the time.
- Turn the map so the way you’re going is always straight ahead. You can use a compass for this, or you can do it simply by looking around you. Turn the map each time you turn a corner – this is called keeping your map SET.
- Use your thumb to keep track of where you are as you walk, jog or run. Watch for path junctions and other points to “tick off” as you pass them.
- Focus on getting your navigation accurate and run at a speed which allows you to do that
- The course is marked by straight lines between the control circles but you might use paths that are less direct. If you’re doing an Orange course (or harder), you’ll have some route choices – often a matter of choosing between a longer run along paths or a shorter, more direct route.
- Visit the controls in the order shown. Control descriptions tell you the code of the marker you’ll find, and a brief description of the feature that it’s on. If you find a control with a different code, ignore it, it’s not yours!
- Control descriptions might look confusing, but if you simply navigate to the centre of the circle, you’ll find the marker. There’s a card to help you translate the symbols into English, but you can manage without it!
- Look at the map scale; work out what distance is represented on the ground by a centimetre on the map. How many double-paces will it take you to cover that distance?
- If you’re at an event, always report to DOWNLOAD even if you haven’t completed your course – otherwise the search parties will be sent out to look for you!
If you have any questions, don’t be afraid to ask!